You can now locate your data on a share network drive and share them with other users. This means several users can work on the same database in the same time and input and view data.
To do so, you need to have a site licence.
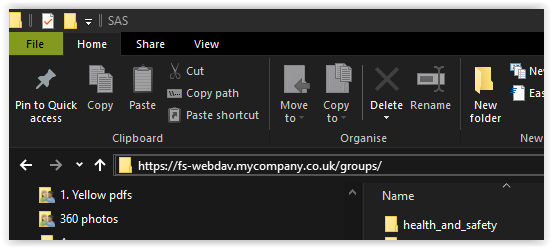
This facility does not work with WebDAV drives. WebDav (Web Distributed Authoring and Versioning) drives are a way of sharing folders and documents on the web. A WebDav folder path in windows explorer will look something like the picture below. The address is basically a web address i.e. https://fs-webdav.mycompany.co.uk/groups/. WebDav folders are not supported by Microsoft Access.
To share the software on a network drive, You need to follow a series of steps:
- Install the software files on a local drive as instructed here: Local drive
- Right-click on RHSDataInput_be.accdb and click 'copy'
- Navigate to your network drive and paste the file in an appropriate folder
- Make sure you have registered and received and copied your network licence file in the main software local folder
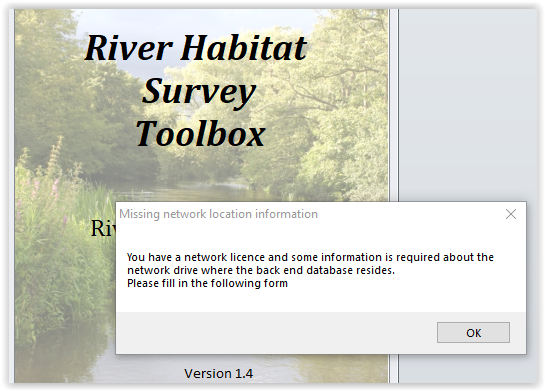
- Double-click on RHSDataInput.accdr and the following message should appear
- Click 'OK' and the following window will appear. Fill in the bottom three fields with the path information for your network drive and the folder where the data will reside. In this case, the network drive will be mapped to the letter 'X' and the root path for the drive is \\server\share and the data folder on the X drive will be located in the Data\RHS folder. When implemented the path for the RHS folder is going to be X:\Data\RHS.
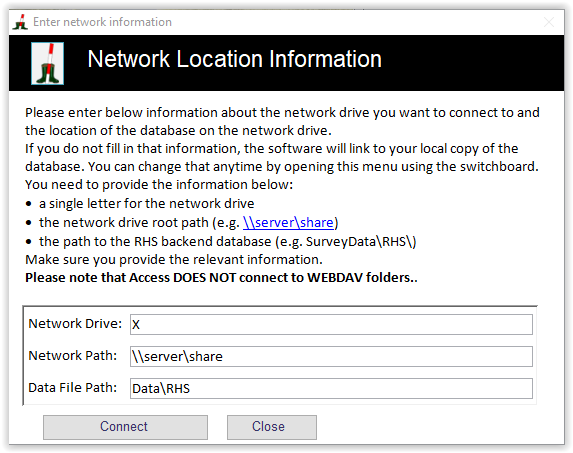
- Click Connect and it will attempt to connect. If there are any issues, e.g. it cannot connect the drive or it cannot find the back end RHS database, it will warn you and ask you to reconnect. If all fail, it will connect to the back end database on your local drive and it will try again to connect the next time you start the application.
- Every time you start the application, it will try to connect to the server and back end database. If it fails, it will open the network information window above and ask for the network details. If it cannot connect, it will connect to the back end database on your local drive.
- Once connected, you will be able to share data with colleagues and view their data
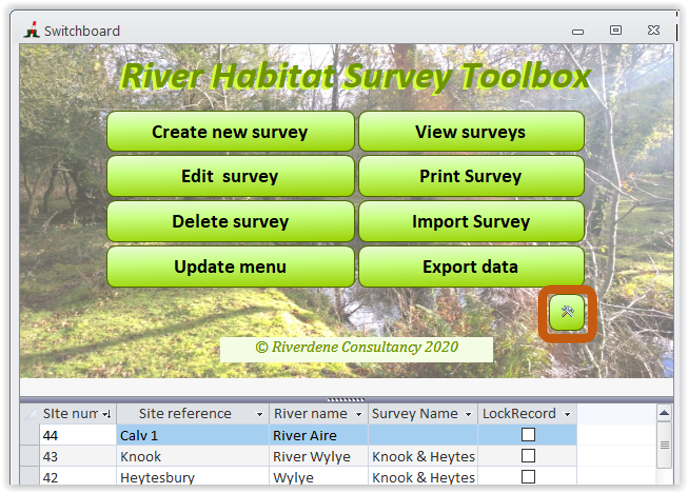
- If you need to change the server details, you can open the network information window by clicking the
 icon on the switchboard (see below). You may need to close and reopen the software for the changes to take effect
Please do not attempt to run the main application (front end RHSDatainput.accdr) from a server. Access is not designed to run on server and it will lead to data and software corruption.